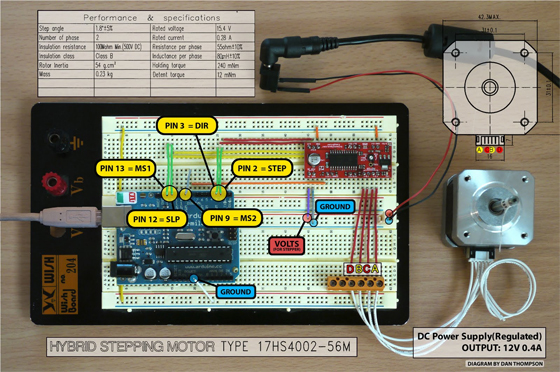
No os perdais este pequeño tutorial creado por Daniel Thompson desde Australia que nos muestra cómo controlar un pequeño motor paso a paso con Arduino utilizando el controlador EasyDriver. Dicha placa es una pequeña maravilla, ya que permite controlar un motor paso a paso con tan sólo dos pines (Dirección y PWM) y es muy fácil de montar. Esto quizás nos sirva para crear nuestra pequeña fresadora o el principio de un super robot que tome conciencia y domine el mundo!
Os dejo el esquema de conexiones y el código fuente a continuación...
Gracias José Luis por la noticia!
///////////////////////////////////////////////////////////
// Stepper Motor skecth for use with the EasyDriver v4.2 //
///////////////////////////////////////////////////////////

// Dan Thompson 2010
//
// Use this code at your own risk.
//
// For all the product details visit https://www.schmalzhaus.com/EasyDriver/
// For the full tutorial visit https://danthompsonsblog.blogspot.com/


////// ED_v4  Step Mode Chart //////
//                                //
//   MS1 MS2 Resolution           //
//   L   L   Full step (2 phase)  //
//   H   L   Half step            //
//   L   H   Quarter step         //
//   H   H   Eighth step          //
//                                //
////////////////////////////////////

int DIR = 3;          // PIN  3 = DIR
int STEP = 2;        // PIN  2 = STEP
int MS1 = 13;        // PIN 13 = MS
int MS2 = 9;         // PIN  9 = MS2
int SLEEP = 12;      // PIN 12 = SLP


void setup() {
  Serial.begin(9600);     // open the serial connection at 9600bps
  pinMode(DIR, OUTPUT);   // set pin 3 to output
  pinMode(STEP, OUTPUT);  // set pin 2 to output
  pinMode(MS1, OUTPUT);   // set pin 13 to output
  pinMode(MS2, OUTPUT);   // set pin 9 to output
  pinMode(SLEEP, OUTPUT); // set pin 12 to output
}


void loop()
{
  int modeType = 1;                         // This number increases by multiple of 2 each through the while loop..
                                            // ..to identify our step mode type.
  while (modeType<=8){                      // loops the following block of code 4 times before repeating .
    digitalWrite(DIR, LOW);                 // Set the direction change LOW to HIGH to go in opposite direction
    digitalWrite(MS1, MS1_MODE(modeType));  // Set state of MS1 based on the returned value from the MS1_MODE() switch statement.
    digitalWrite(MS2, MS2_MODE(modeType));  // Set state of MS2 based on the returned value from the MS2_MODE() switch statement.
    digitalWrite(SLEEP, HIGH);              // Set the Sleep mode to AWAKE.

    int i = 0;                              // Set the counter variable.
    while(i<(modeType*200))                 // Iterate for 200, then 400, then 800, then 1600 steps.
                                            // Then reset to 200 and start again.
    {
      digitalWrite(STEP, LOW);              // This LOW to HIGH change is what creates the..
      digitalWrite(STEP, HIGH);             // .."Rising Edge" so the easydriver knows to when to step.
      delayMicroseconds(1600/modeType);     // This delay time determines the speed of the stepper motor.
                                            // Delay shortens from 1600 to 800 to 400 to 200 then resets

      i++;
    }
    modeType = modeType * 2;                // Multiply the current modeType value by 2 and make the result the new value for modeType.
                                            // This will make the modeType variable count 1,2,4,8 each time we pass though the while loop.

    delay(500);
  }
  digitalWrite(SLEEP, LOW);                 // switch off the power to stepper
  Serial.print("SLEEPING..");
  delay(1000);
  Serial.print("z");
  delay(1000);
  Serial.print("z");
  delay(1000);
  Serial.print("z");
  delay(1000);
  Serial.println("");
  digitalWrite(SLEEP, HIGH);
  Serial.println("AWAKE!!!");                // Switch on the power to stepper
  delay(1000);
}


int MS1_MODE(int MS1_StepMode){              // A function that returns a High or Low state number for MS1 pin
  switch(MS1_StepMode){                      // Switch statement for changing the MS1 pin state
                                             // Different input states allowed are 1,2,4 or 8
  case 1:
    MS1_StepMode = 0;
    Serial.println("Step Mode is Full...");
    break;
  case 2:
    MS1_StepMode = 1;
    Serial.println("Step Mode is Half...");
    break;
  case 4:
    MS1_StepMode = 0;
    Serial.println("Step Mode is Quarter...");
    break;
  case 8:
    MS1_StepMode = 1;
    Serial.println("Step Mode is Eighth...");
    break;
  }
  return MS1_StepMode;
}


int MS2_MODE(int MS2_StepMode){              // A function that returns a High or Low state number for MS2 pin
  switch(MS2_StepMode){                      // Switch statement for changing the MS2 pin state
                                             // Different input states allowed are 1,2,4 or 8
  case 1:
    MS2_StepMode = 0;
    break;
  case 2:
    MS2_StepMode = 0;
    break;
  case 4:
    MS2_StepMode = 1;
    break;
  case 8:
    MS2_StepMode = 1;
    break;
  }
  return MS2_StepMode;
}
Material necesario


 Cómo controlar el robot Escornabot por Bluetooth con M5Stack Core
 Máquina mezcladora de bebidas controlada con Arduino y AngularJS
 Cómo hacer un menú para LCD con Arduino
 Medidor de consumo eléctrico casero con ESP8266
 La historia de Arduino y cómo ha nacido
 Tutorial de cómo montar un robot OTTO DIY

